

Let’s Set Up Your Profile:
Profile Picture:
Color Scheme: Utilize a gradient color scheme.
Headshot: High-quality picture of your face (don’t use selfies).
Personal Examples: I used a headshot from my lower neck to the top of my head. Keep some space between all sides of your face to allow room for the gradient color scheme. I chose a beautiful purple and blue color scheme. I’m now recognized as the top creator with this color scheme.


Templates: I created a profile picture template you can edit in both Photoshop and Canva. Simply the image of your choice and change the color scheme to the one of your choosing.
Profile Banner:
Color Scheme: Utilize the same gradient color scheme you used for your profile picture.
Copy: Use a 1-liner that explains what you do and the outcome it produces.
CTA: Add a simple call-to-action to get your prospects to take action.
Personal Examples: I chose the simplistic/minimalistic approach for my banner. I’d highly recommend you do the same. The easier it is to read, the easier it is for your prospects to take action.
I am using the same blue and purple gradient that I chose for my profile picture.
For the copy, I am using social proof to showcase I’m an expert in my field: “Join 28,776+ Creators”.
For my 1-liner, I’m expressing an outcome my prospects can achieve if they join “The Growth Innovator”: “If you want to create content that boosts your sales and makes you money…”
For the CTA, I’m using a simple button-style design to get my prospects to my landing page: “Click the link below to join”.
In the top left of my banner, I use another simple CTA to get my prospects to my featured section: “Check out my Featured section”.
The more straightforward your banner is, the better it will convert your viewers to followers, and followers to customers.

Templates: I created a profile banner template you can edit in both Photoshop and Canva. Simply change the copy, social proof, and color scheme of your choosing.
LinkedIn Banner Size: 1584 x 396
Profile Headline (Bio):
Copy: Use a 1-liner that explains what your audience can expect from your content.
Important: Don’t use excess emojis, hashtags, “|” copy, or words like “Expert”. All very unnecessary and won’t get people to earn your trust. Don’t be sloppy.
Personal Examples: I chose to go the simple route of what my audience can expect if they follow me on LinkedIn.
Here’s what that looks like: “Follow for Daily Insights on Creating Content that Sells”

ChatGPT Script: Feel free to use my ChatGPT script to create your profile headline.
Simply fill in the information in the script, and you’ll have your own in seconds:
Here is my LinkedIn profile headline: "Follow for Daily Insights on Creating Content that Sells" Here is the template I need you to follow: Follow for Daily Insights on [Outcome of Posted Content] Every day, I post content that [What Your Content Does (Outcome)] My target audience is [Your Target Audience]. Please write a 1-liner using the same template provided above.
Link in Bio + Call to Action:
Copy: Use a 1-liner that gets your audience curious about what you have for them.
Length: Keep it less than 28 characters.
Personal Examples: 80% of my revenue comes directly from sending 2x emails per week. So, the main goal of my profile is to capture emails from my prospects.
Here’s what the link in my bio looks like: “Get My FREE 5-Day Course ➡️”
A few things to note:
- It’s free.
- It’s a course.
- It’s valuable to my audience.
I’d highly recommend the following:
- Capture Emails
- Offer Free Digital Products
My favorite way to capture emails is through a lead magnet. When your prospect grabs your lead magnet, they are automatically enrolled in your newsletter (exclusive content is what I call mine). I use Beehiiv for this.
In the Newsletter Module, I dive deep into how to set up your landing page, capture emails on your website, and how to properly set up a free lead magnet.
Here’s the flow of my profile funnel:
- The user clicks on my profile.
- The user enjoys what they see.
- The user checks out the link in my bio.
- The user is compelled by my landing page.
- The user provides an email (joins my email list).
- The user receives emails from me.
- The user found an email intriguing.
- The user clicks on a link in my email.
- The user is now on my product page.
- The user is now a paying customer.
This is exactly why your profile is so important. It should flow without any confusion.

ChatGPT Script: Feel free to use my ChatGPT script to create your own CTA.
Simply fill in the information in the script, and you’ll have your own in seconds:
Here is my LinkedIn link in bio: "Get My FREE 5-Day Email Course"Please create 10 CTAs (call to actions) that get my prospects curoius to click on what I have to offer. The content I provide within my CTA is [Your Lead Magnet Outcome + Content].
The CTA should be less than 28 characters.
Please use the same formatting and word choice as the reference example I provided.
Featured Section:
Color Scheme: Utilize the same gradient color scheme you used for your profile graphics.
Items: One (1) high-ticket offer. One (1) low-ticket offer (or free lead magnet).
Personal Examples: Think of your featured section as a store.
Here’s what I am in my featured section:
- The Growth OS
- Personal Branding + Copywriting Services
The free 5-day email course in my bio is to capture emails. Straight forward, and not confusing for my audience.
In my featured section, I’ve got my low-ticket offer (The Growth OS Video Course) and my high-ticket offer (Client Services).
It’s difficult to only sell high-ticket when starting. Offer both. If you don’t have paid products, use free lead magnets at the start. Your featured section can consist of only free offers as well.
Keep your featured section clean and not busy. Having 1-2 items max is best.
/w=3840,quality=90,fit=scale-down)
Templates: I created a featured section template you can edit in both Photoshop and Canva. Simply change the copy, social proof, and color scheme of your choosing.
Featured Section Image Size: 1126 x 627
Now, Your Content Workflow:
Software: I use Taplio for a majority of my LinkedIn systems.
- Scheduling Content
- Inspiration
- Auto-Plugs
- AI Writing
- CRM
- Analytics
Before I dive into each aspect of my LinkedIn Content Workflow, remember this:
Consistency is everything. If you want results, you need to show up. Put in the work. Improve and adapt as you go. Let’s get it:
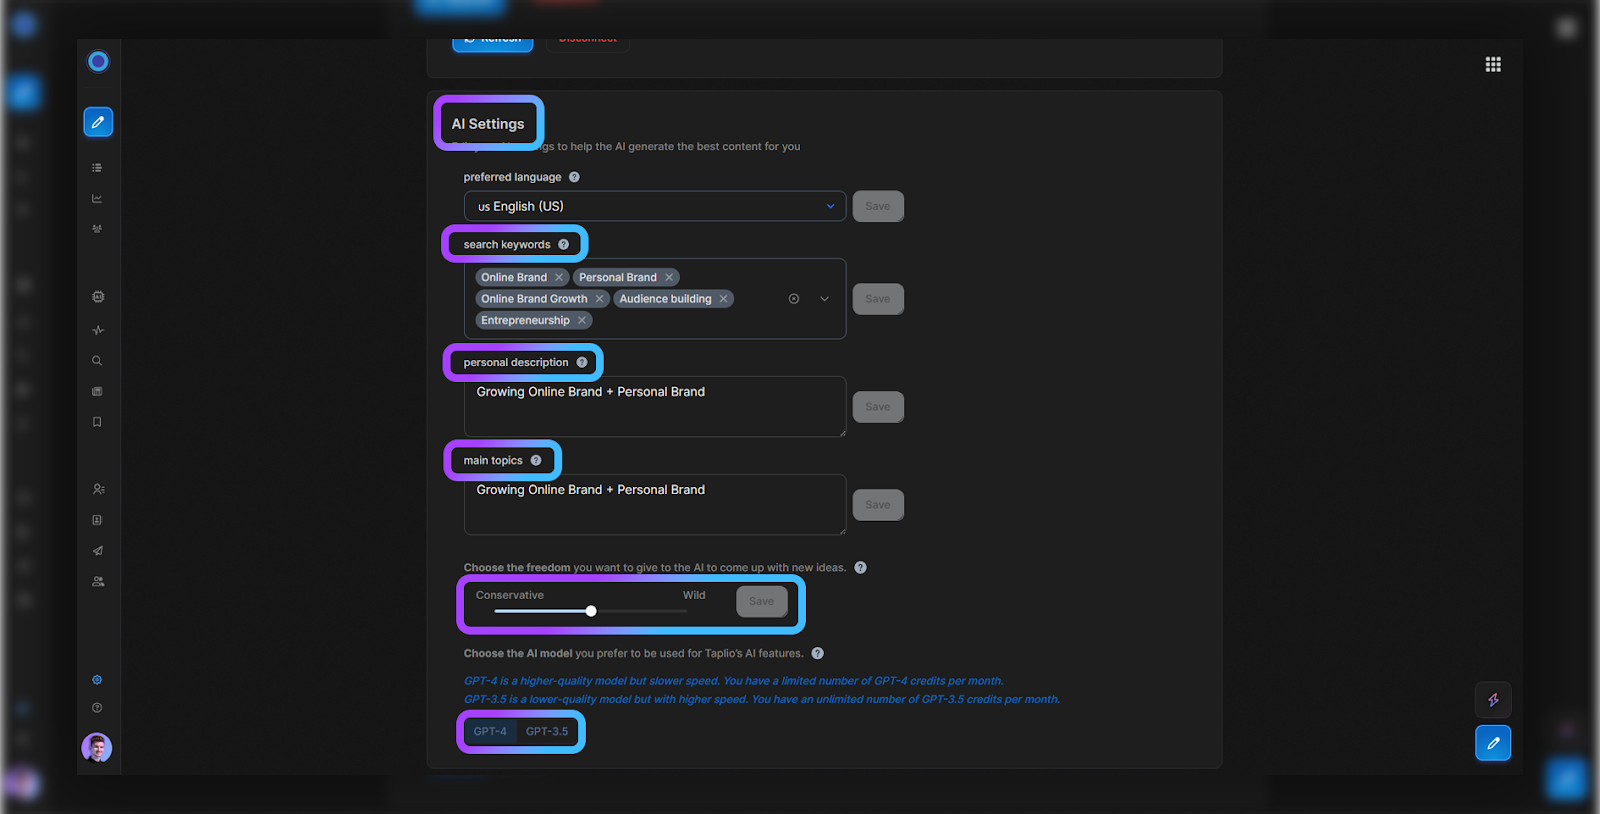
Taplio Settings:
Taplio > Account Settings
From here, let’s make a few changes:
- Add Search Keywords
- Add Description
- Add Main Topics
- Set AI Tone (Conservative to Wild)
- GPT-4 or GPT-3.5
These settings are specific for both AI writing and content inspiration.
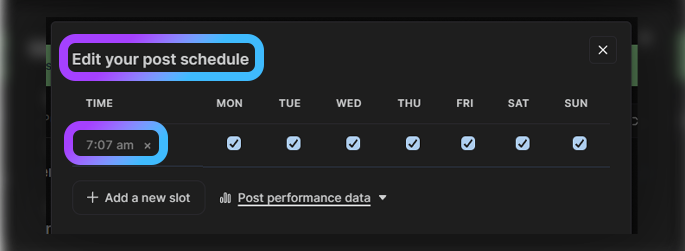
Content Queue + Schedule:
Posting Times: 7:07 AM CST. This is the best posting time due to LinkedIn activity.
Why? Most creators are active at this time. Which means, their audience is, too. I’d highly recommend scheduling your posts at around this time. I’ll get into the engagement steps later on in this module.
I tested posting twice per day and once per day. Based on time consumption and growth, I found that posting once per day was the best choice. This allows you more time to spend time on the business end of your personal brand.
Quality + Quantity = Success.
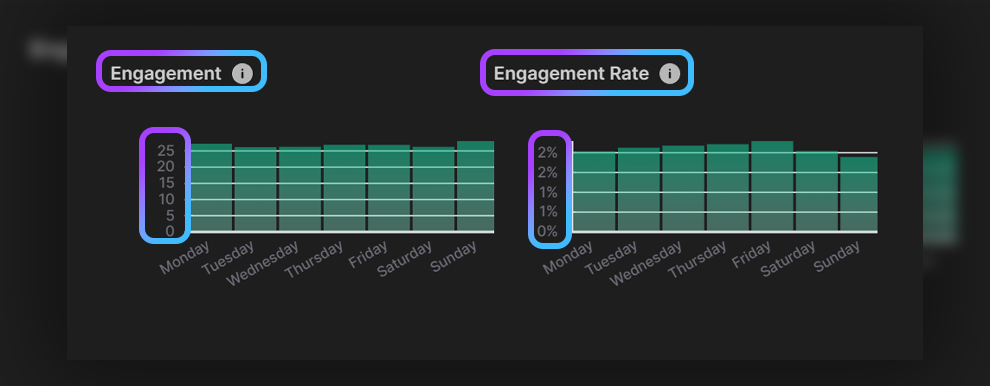
Taplio also has advanced data you can look at. Here are some additional analytics I found for engagement and volume by day of the week:

Here are the analytics I found for engagement by “hour of day”.
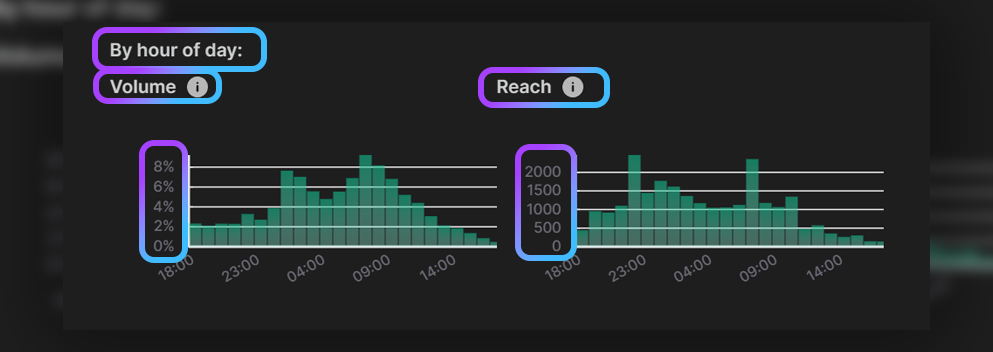

Personally, 7:07 AM CST is my best time for top performance. I’d recommend testing out other times based on the analytics above and see what works best for you.
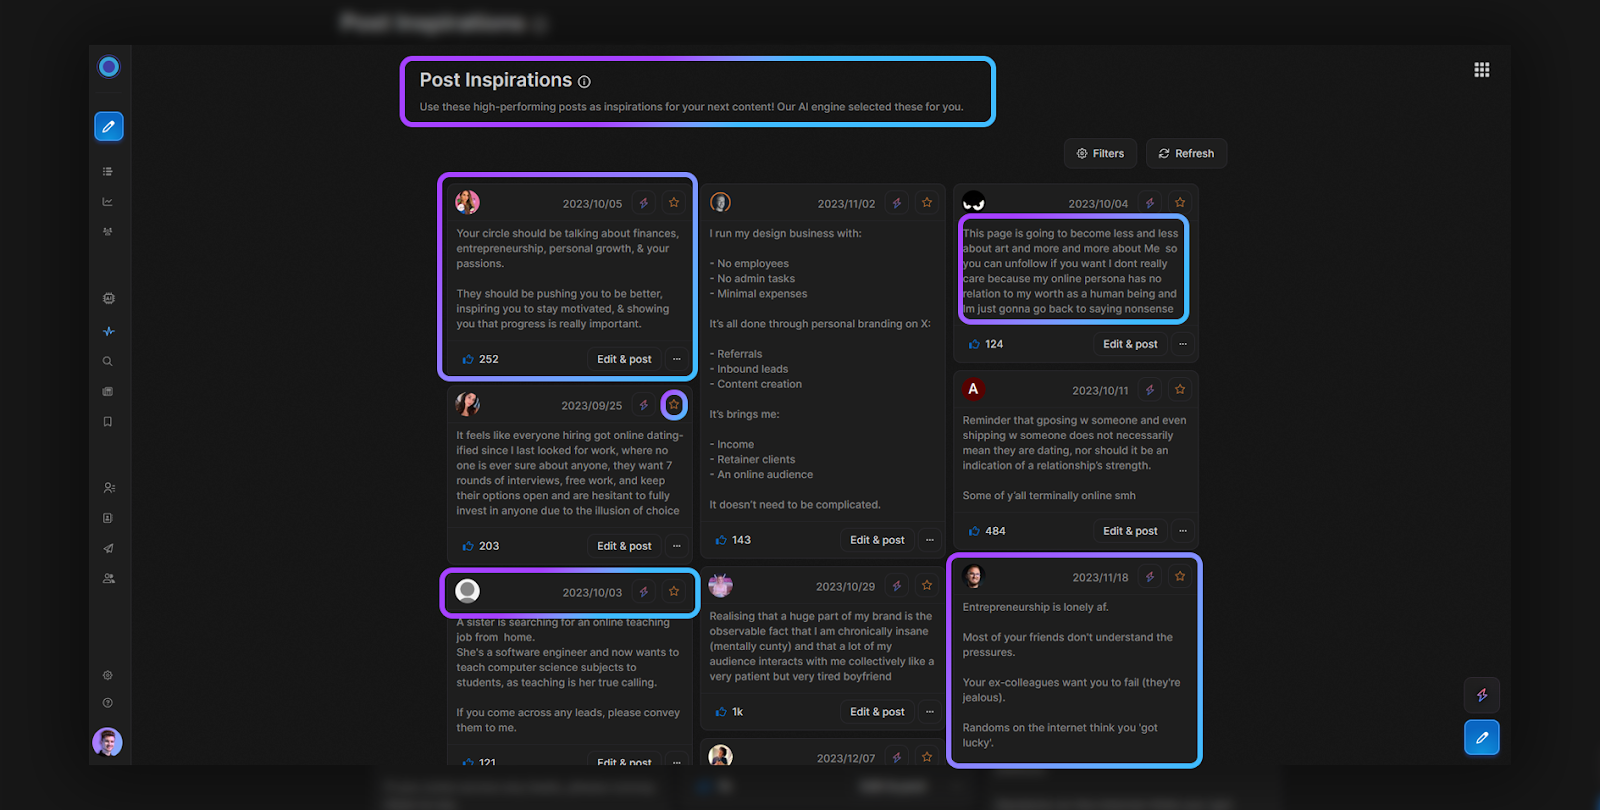
Inspiration:
Taplio > Viral Content
- Search top content
- Filter by time, date, and type of content
Remember, don’t copy other creators word for word. It’s quite obvious for others, especially in the long term. Use ideas, take inspiration, and utilize your content. Here’s what that looks like:
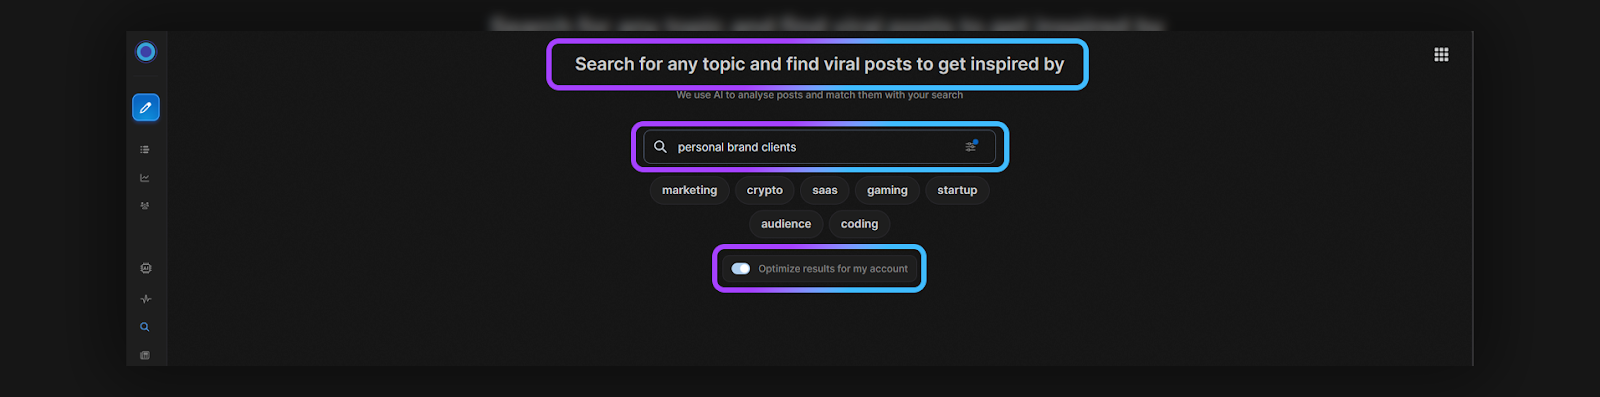
Taplio > Search Mode
- Filter keywords for your niche.
- Find a post that will resonate with your audience.
- Take the idea and make it into your style, voice, and overall vibe.
I’d recommend trying both of these when you need ideas.
I prefer the “Viral Content” feature as that content has already performed well in the past. Here’s what that looks like:
Don’t try to be like someone you are not.
Content Schedule:
Posting Time: 7:07 AM CST
Posting Days: Every Day
Posting Ratio: 80% Educational | 20% Promotional
I’ve spent months testing which days are best for specific types of content. Here’s the exact content schedule I use every week on LinkedIn:
- Sunday - Plug for Saturday's Newsletter (Link to Post)
- Monday - Single Image (How To)
- Tuesday - Customer Testimonial
- Wednesday - Selfie Post (Story)
- Thursday - Plug for Wednesday's Newsletter (Link to Post)
- Friday - Selfie Post (Story)
- Saturday - Single Image (How To)
LinkedIn is removing carousels from the platform as of 2024. This is the reason why you don’t see carousels in my content schedule.
Tuesdays & Saturdays are typically the days I use to promote my course, coaching program, and client services. I’d recommend setting 1-2 days aside for promoting your offers. Sell, without “selling”. I’ll show you how I do this later in this module.
If you don’t have time to write one post per day, focus on 4-7 posts per week. If you don’t have time to make content at all, let’s schedule a call. I’m happy to create your content for you.
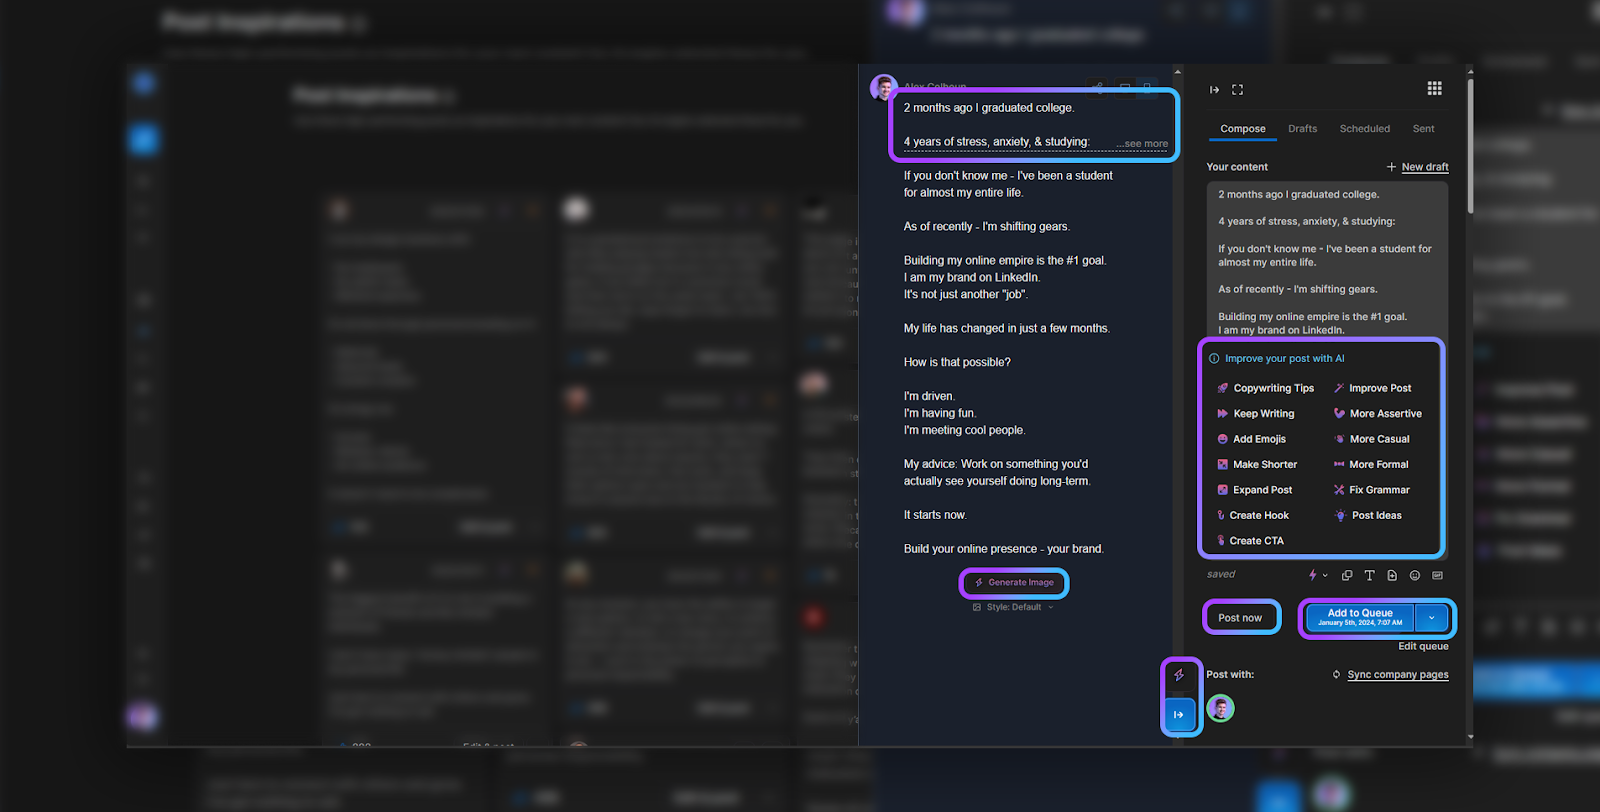
AI Writing:
Improvements:
- Copywriting Tips
- Keep Writing
- Add Emojis
- Make Shorter
- Expand Post
- Create Hooks
- Create CTA
- Improve Post
- More Assertive
- More Casual
- More Formal
- Fix Grammar
- Post Ideas
I typically write 5-10 posts every time I sit down to create content. A lot of thoughts go through my mind when I write. Having these improvement options on Taplio helps a LOT when I’m stuck with specific words to use.
Your content creation process will become much easier once you master this.
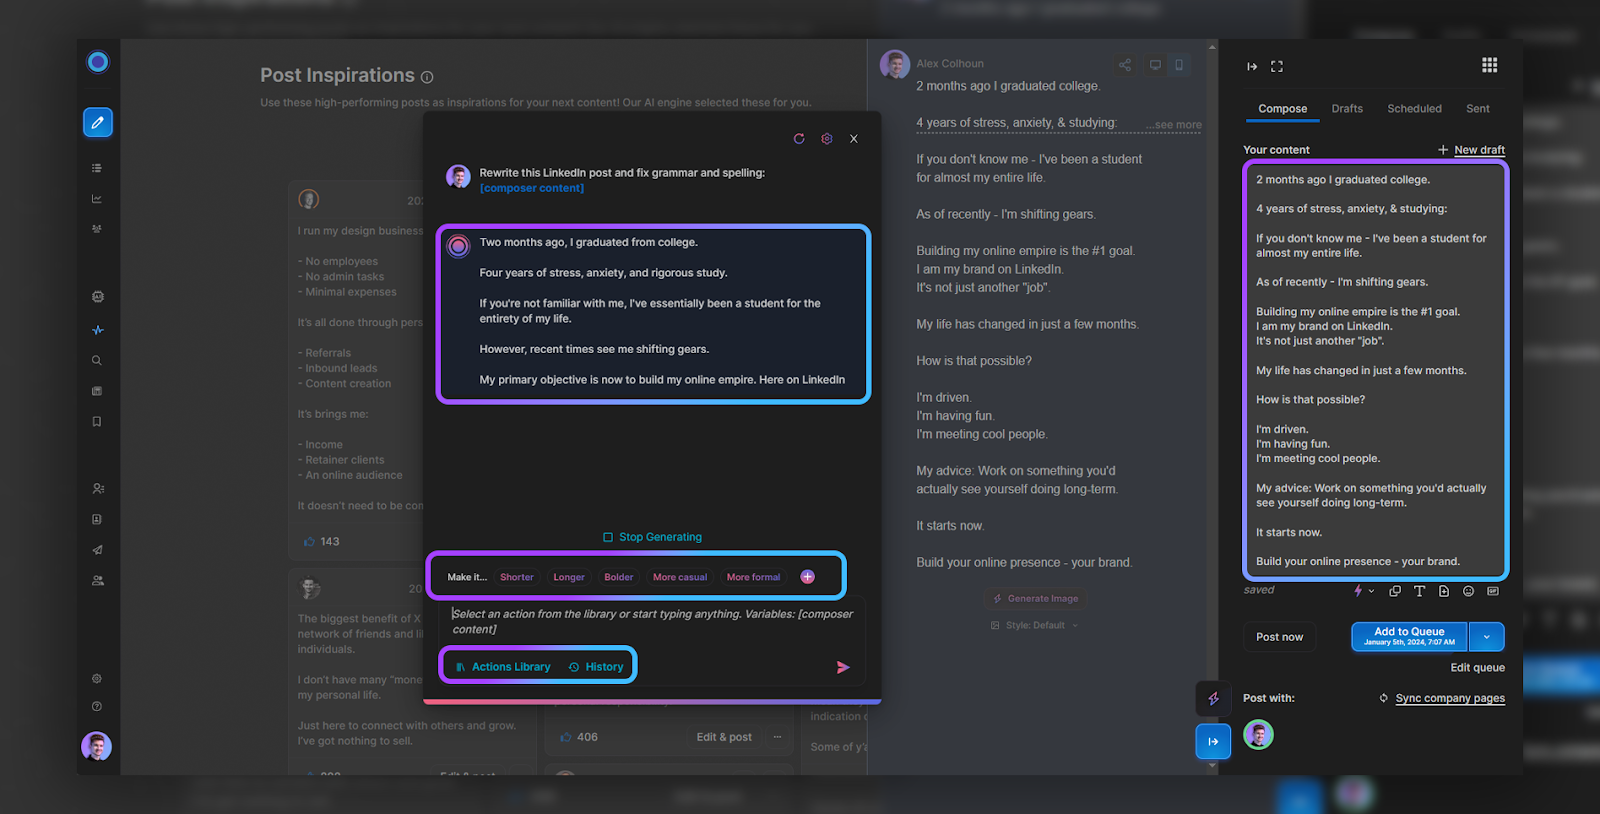
As always, only use AI to write small bits of your text, or for inspiration. Don’t fall into having AI write your entire post. AI text doesn’t sound like you, so you mustn’t use it directly.
Here’s an example of me using it to fix grammar errors:
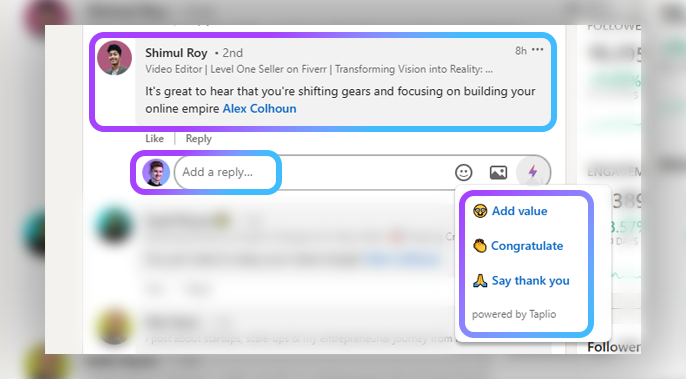
Another cool feature is the Taplio AI comment generator. You can use AI to create comments on other creator’s posts.
Here are the options:
- Add Value
- Congratulate
- Say Thank You
I don’t use this feature, but I wanted to share it in case you found it interesting for your engagement system. More on engaging later in this module.
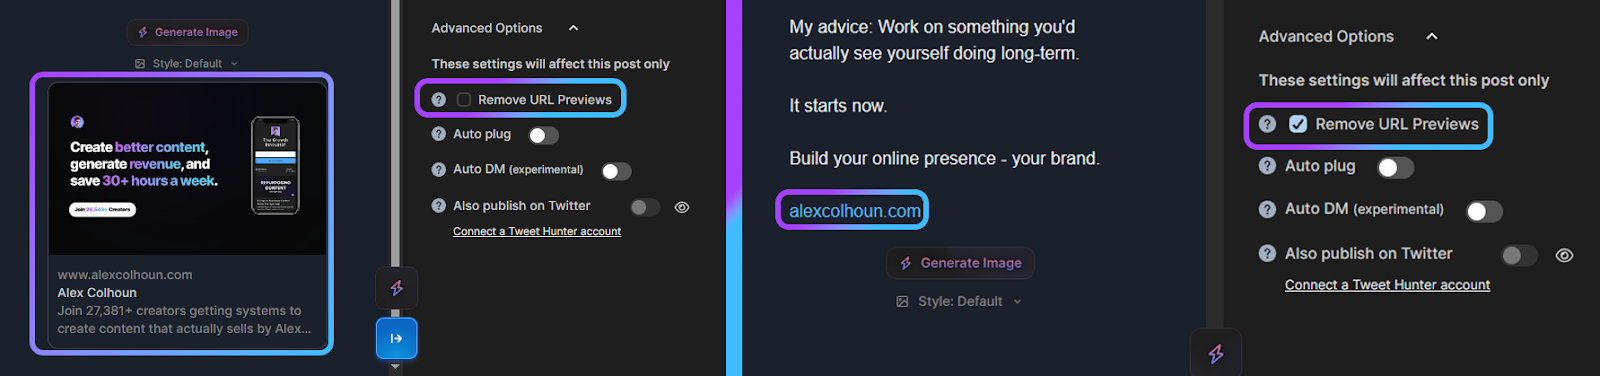
Advanced Options:
Features: URL Previews, Auto-Plugs, & Auto-DMsLocation: Bottom of the “compose” area.
Each of these features has its unique purpose. I use most of them every single day I’m posting content. See below for how I use each one:
URL Previews: Here’s an example of what the URL preview looks like when it’s enabled, and when it’s disabled:
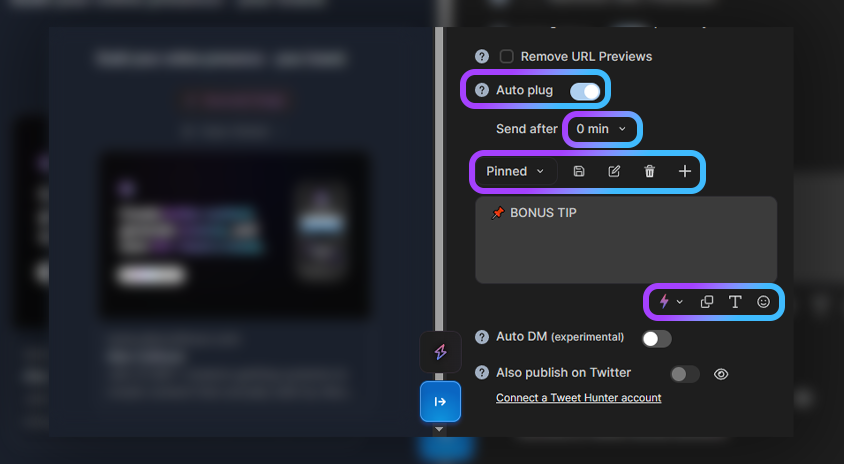
Auto-Plugs: This is one of my favorite features on LinkedIn. The ability to automatically post replies to your posts.
Here are my settings:
- Auto-Plugs > Enabled
- Send After > 0 Minutes
- Template > Pinned (Use the 📌 emoji)
Why use the Auto-Plug feature?
Asking a question, adding additional value, or simply promoting something in your comments gradually gets more of your audience to reply to your comment. Your comment will become the top comment of your post, and overall give you more reach.
More Engagement = More Reach
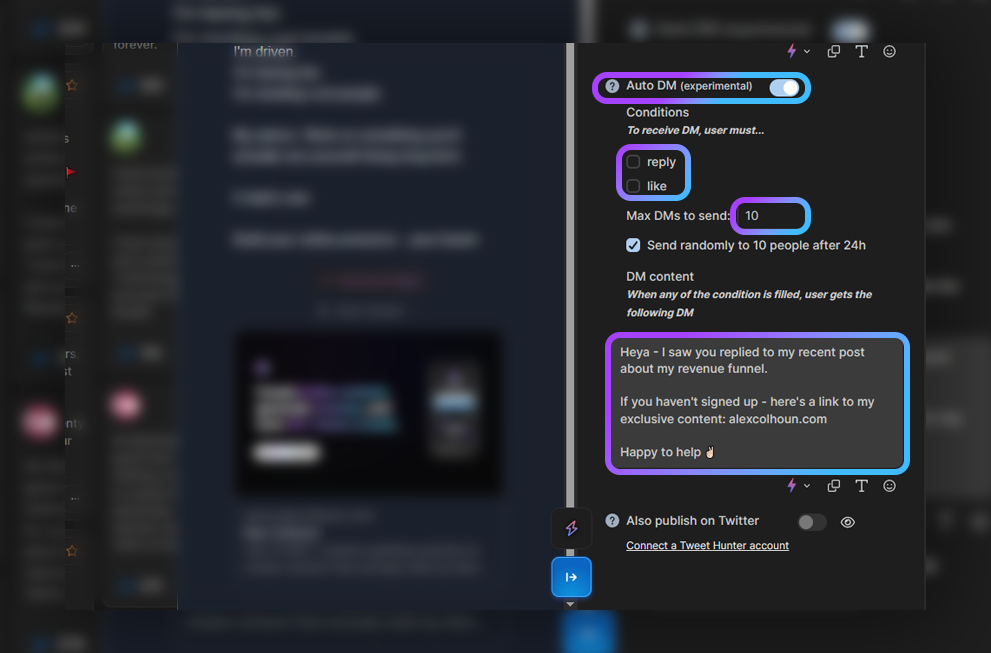
Auto-DMs: Very useful tool that I use as part of my content system.
Here are the settings I used for a recent post:
- Auto-DM > Enabled
- Conditions > Reply
- Max DMs to Send > 10
- Send Randomly to 10 People After 24 Hours > Enabled
Here’s the message I used:
Heya - I saw you replied to my recent post about my revenue funnel. If you haven't signed up - here's a link to my exclusive content: alexcolhoun.com Happy to help ✌🏻
Using Auto-DMs is an easy way to further engage with your audience, instead of always just replying to their comments. It’s also a great way to start a conversation directly in DMs (which you can promote your paid offers later on).
Ask for Reposts (not likes) + Use P.S: This is how I personalize my posts.
Here’s exactly how to implement this:
- At the end of each post, ask for a repost.
- Likes are nice, but a repost will be 10000x more beneficial.
- I typically only use one CTA. For the example below, I asked for a “repost”.
Here’s the text I use: “P.S. ♻️ Repost if you found this helpful.”
Post Design:
Software: Photoshop (you can use Canva too)
Price: Adobe Products are $29.99 / Month (Canva is free)
Color Scheme: Blue + Purple Gradient
Font: Inter Black, Inter Bold, & Inter Slim
I’m not close to an expert graphic designer. BUT, I’ve taken the time to master one thing: creating content for myself.
LinkedIn is removing the ability to post carousels on the platform. I’m not sure if this is forever, and there are still ways to get around it. I’ve linked my carousel design template below for you to use.
Carousel Template:
Single Post Template:
Client Testimonial Template:
Client Analytics Template:
I always recommend creating a simple, straightforward, and easy-to-read
I’d highly recommend building a template for your carousels and general posts. If you try to create something “new” every time you post, you’ll have a hard time.
Remember to stick with one color scheme for all of your posts.
Best way to learn how to design in Photoshop?
Just practice using different tools. Every time I don’t know how to do something - I go on YouTube and figure it out. There are endless tutorials on how to edit.
Take the time so you can create better content for your audience.

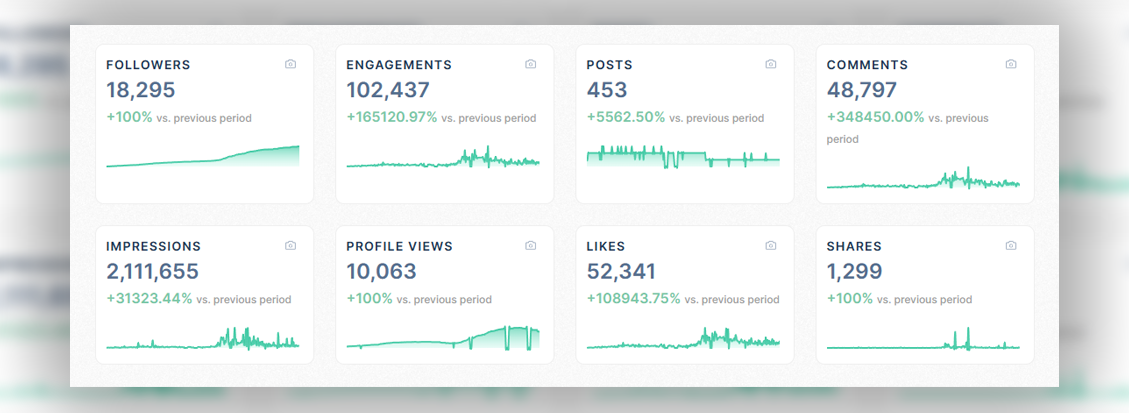
Leveraging Analytics:
I use Taplio for my LinkedIn analytics. One of the best ways to grow on LinkedIn is to look at your analytics, find what’s working, and what’s not working, and leverage that to your advantage.
Here’s what to track:
- Followers
- Engagements
- Comments
- Impressions
- Profile Views
- Likes
- Reposts (Shares)
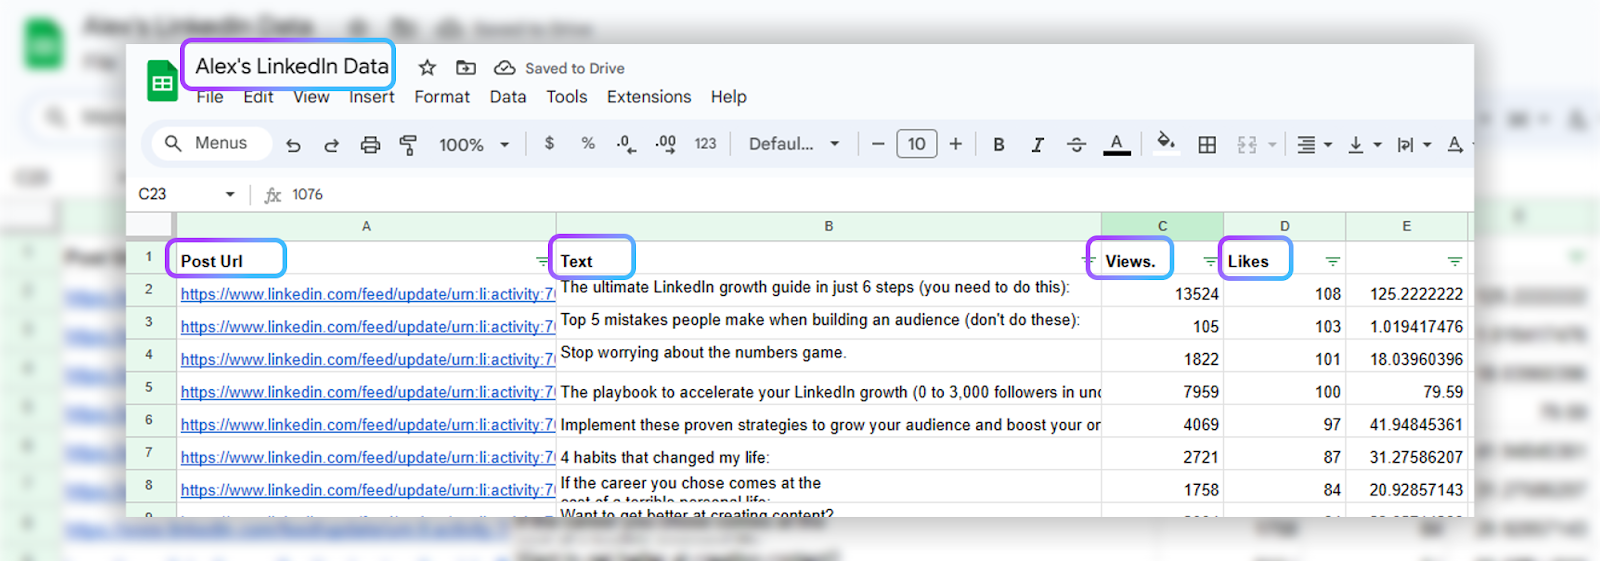
Here’s how I use my analytics to repurpose my content:
- Go to the Taplio “My Stats” tab
- Scroll down to your post analytics
- Select the “Export CSV”
- Important to Google Sheets or Excel
- Remove all columns except “Post Link”, “Post Text”, “Likes”, and “Impressions.”
- Add a new column.
- Create a formula to divide “Impressions” and “Likes”
- Auto-fill to the rest of the document
- Filter from “Z → A”
- Now, your top-performing posts will be displayed at the top.

Once you have the spreadsheet built, it’s time to repurpose your content. There are multiple ways I do this.
After 60 days of posting content, I export my posts into the spreadsheet. Remember, no one remembers your content like you do. Your current audience (and new followers) most likely will not remember your posts from months ago.
- Copy/paste your old posts and repost them.
- Copy/paste your old posts, reformat them, and repost them.
- Copy/paste your old posts, change copy, reformat them, and repost them.
I choose which one of the three to do depending on how much time I have. If I’m in a rush, I’ll do the first option. If I have some time to spare, I’ll do the second option. If I have lots of time on my hands, I’ll do the third option.
If you decide not to use Taplio, you can export your posts in the “Analytics” tab on LinkedIn.
Most Importantly - Engaging:
Engaging on LinkedIn is the easiest and most efficient way to grow.
A lot of creators will tell you how to engage properly… But I’ve seen some ridiculous ideas that seem super time-inefficient.
Here’s how I grow 50+ followers a day simply by engaging:
- Create a list of creators you want to engage with.
- For this step, larger creators are better.
- Build a spreadsheet with the following items:
- Name of Creator
- Follower Count
- Profile Link
- Posting Time
- Frequency of Posting
- Once you figure out their posting times, turn on notifications.
- LinkedIn notifications don’t work well at all, I use the reminders app on my iPhone to alert me.
- Once the creator posts, be one of the first to comment.
- Add value to the post, this could be with a quote, using emojis, giving your perspective, etc.
- Do not post “Good work!” or “I love this”. You’ll waste your time.
- Additionally, comment on 4-5 other comments on the post.
- Don’t sit all day doing this, time block certain times of the day to spend 15-20 minutes on LinkedIn.
When it comes to your posts, respond to as many of the comments as you can.
Feel free to steal some of the creators below that I engage with on the daily:
You can use my spreadsheet here (I update frequently): https://docs.google.com/spreadsheets/d/1udLIUG4llYqjI_Zf8jTJdjX0CqvaJ43G54nh2GQO6Yk/edit?usp=sharing
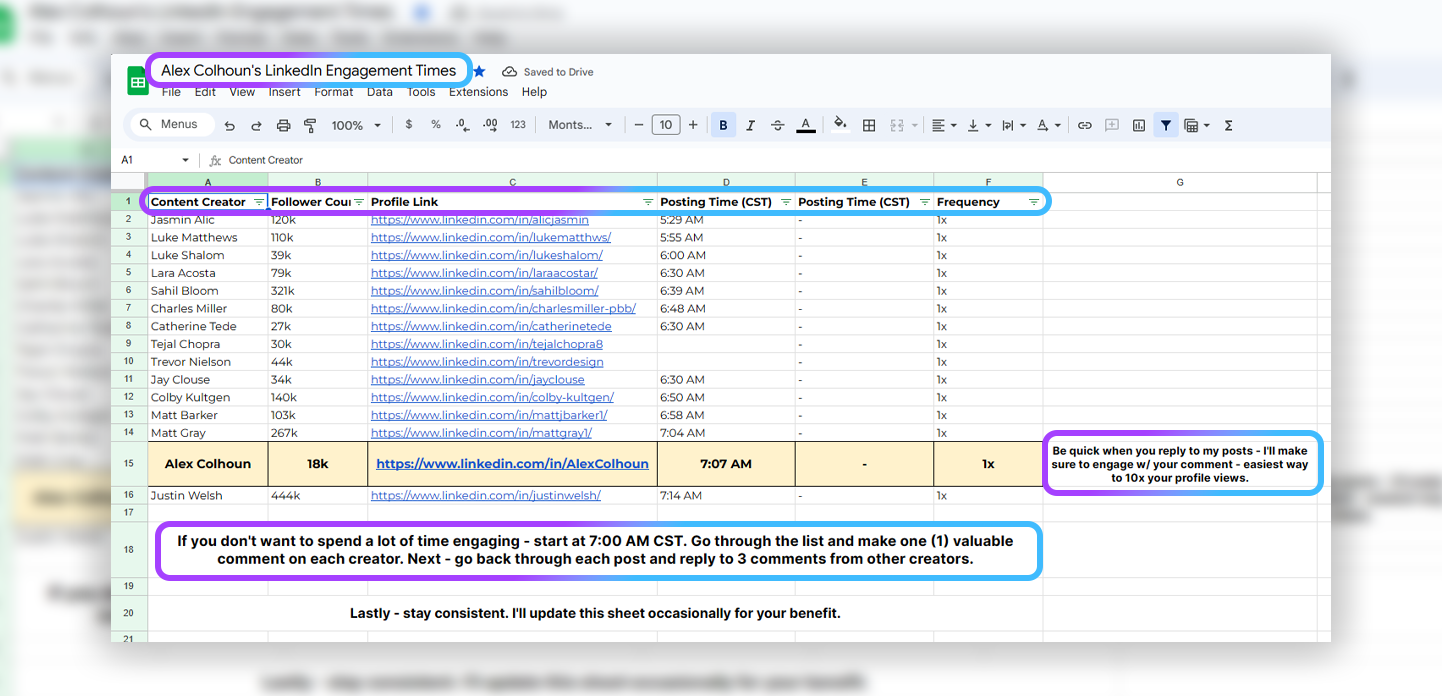
Feel free to create a copy of the spreadsheet and add your creators to it.
To find the EXACT times they post - use my LinkedIn Post Extractor:
Another awesome engagement “hack” is to boost your comments. Right after you send a comment on a creator's post, like your comment on your LinkedIn pages.
You can do this by simply pressing the down arrow next to the like button, selecting a different page, and then like your comment. This will automatically boost your comment to the top of the creator’s post, getting more views than normal.
If you don’t have any other pages (yet), you can create them here: Create a LinkedIn Page | LinkedIn Help

Connection Requests:
You can send up to 100 connection requests per week.
I send 15-20 connections per day until I hit the maximum. To find the best people to connect with, go to creators in your niche and connect with creators in their comment section.
Here’s a template I use for a lot of my connections that you can steal:
Heya [First Name]! I noticed we engage with similar content - looks like you're doing some interesting stuff as well! If you ever want my perspective on creating content or monetizing your LinkedIn - don't hesitate to reach out.
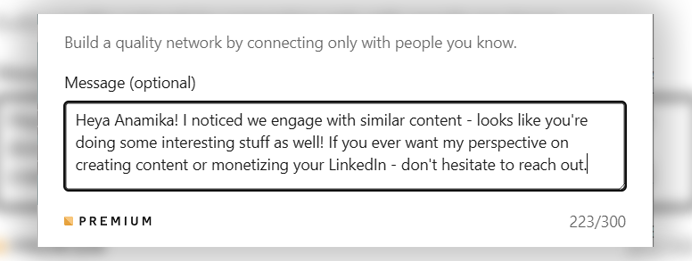
Always send a personalized request. You’ll have a 70% higher chance of someone accepting it.
The reason I added the “don’t hesitate to reach out” line is because I want to start a conversation. The second my prospect messages me with a question, that’s a green light to push towards offering my paid offers.

If you’d like personalized guidance - there are 2 additional ways I can help you:
1. Coaching Session w/ Alex: If you’re looking for the most efficient way to take your online brand/business to the next level - 1:1 coaching is the way to go. Book a time that works for you and let’s take your business to the next level.
2. Personal Branding & Copywriting Services: I'll write your content, build back-end systems, grow your email list, and scale your online business allowing you to spend more time on the things that matter.


